We can use so many methods to format hard drive in our computer. but we have to make sure wen we format a hard disk in vista, it allow us to create a partition also at the same time. in this introduction i will tell you to how we can do both work at once. You first need to prepare your computer for formatting and save all your files that you would like to keep. Then you need to
delete your hard drive and then format it. follow my instructions.
First Step: Preparation
The first step in this how to format a hard drive tutorial is to prepare your hard drive for formation. Remember everything you have on this hard drive will be lost. So be very careful before you click, 'delete partition'. Make sure you check your desktop, your my documents folders, maybe export your emails and address book and save your favorites. Once you are happy that all your files have been saved move on to the next step. Save all your files onto a CD, DVD, or another hard drive or partition (that you won't be deleting).
Second Step: Delete Partition
If your using Windows vista or w7, go start, control panel, administrative tools and then double clickformat hard drive computer management. You will need to press continue. Then select Storage, Disk Management and right click on the partition on the bottom of the page and select delete volume. The Print Screen on the right explains it easily.

Third Step: Format Hard Drivehow to format a hard drive step 3
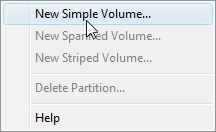
Once you have deleted the partition simply right click on the unallocated space and select new simple volume. Follow the new simple volume wizard. When you get to the option of NTFS and FAT32 choose NTFS because its faster and more secure. Click here to view more reasons why NTFS is better.
Fill in the volume label (which is the name of the hard drive) and continue to follow the prompts. The computer will then format your hard drive. Depending on the size of your hard drive and whether you selected quick format or not, this could take a very long time or a shorter amount of time. Once it completes your hard drive is finished and ready to use.
Source-computertipssupport


0 comments:
Post a Comment